DIY Storage Solutions to Maximize Small Kitchen Space
DIY Storage Solutions for Small Kitchens can help you make the most of every inch of available space. A small kitchen doesn’t mean you have to sacrifice functionality or style. With the right DIY storage solutions, you can transform even the tiniest cooking space into an organized, efficient hub that meets all your culinary needs. Whether you’re working with a compact apartment kitchen, a tiny house setup, or simply a home with limited square footage, creative storage hacks can help you reclaim valuable space without breaking the bank.
This comprehensive guide will walk you through practical, budget-friendly DIY storage solutions specifically designed for small kitchens—no advanced carpentry skills required. From maximizing vertical space to repurposing everyday items, you’ll discover actionable projects that make the most of every inch while keeping costs low and results impressive.
Understanding Your Small Kitchen’s Storage Challenges
Before diving into DIY projects, it’s essential to assess your kitchen’s specific storage pain points. Most small kitchens share common challenges: insufficient counter space that quickly becomes cluttered, limited cabinet capacity that can’t accommodate all your cookware and pantry items, and awkward corners or narrow gaps that remain frustratingly unused. You might also struggle with shallow cabinets that waste depth, or high shelves that are difficult to access and therefore underutilized. The first step in solving these problems is conducting a thorough inventory of what you own and what you actually use regularly.
This helps you identify which items deserve prime real estate and which can be stored less accessibly or donated altogether. Planning your DIY storage solutions starts with measuring every available space—including those odd nooks you’ve been ignoring—and sketching out where additional storage could fit. Consider your daily cooking routine and which items you reach for most frequently, as this will inform where to place your most accessible storage. By understanding your unique challenges and creating a thoughtful plan, you’ll ensure your DIY efforts target the areas where they’ll make the biggest impact, transforming frustration into functional, organized space.
Vertical Victory: Unleashing Wall and Cabinet Potential
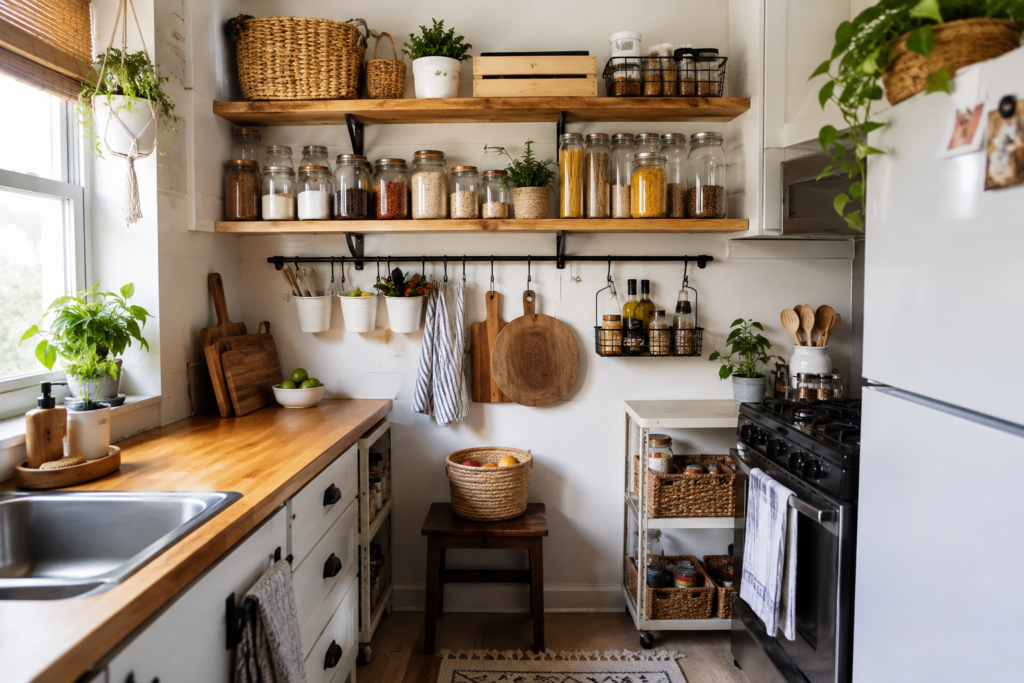
When floor space is limited, the solution is simple: build upward. Vertical storage is perhaps the most underutilized resource in small kitchens, and fortunately, it’s also one of the easiest to implement with basic DIY skills.
Floating Shelves: These are perfect for displaying frequently used dishes, spices, or decorative items while freeing up cabinet space. Materials needed include wooden boards (pine or poplar work well), floating shelf brackets, a level, stud finder, and screws. Cut your boards to the desired length, sand smooth, and apply your choice of stain or paint. Locate wall studs for maximum support, install brackets at the same height using your level, and slide the shelves onto the brackets. For a cohesive look, install 2-3 shelves at varying heights.
Pegboard Systems: A pegboard wall creates customizable storage that adapts as your needs change. Purchase a pegboard panel from any hardware store, along with various hooks, baskets, and shelves designed for pegboard use. Mount the pegboard to the wall using furring strips behind it to create the necessary spacing for hooks. Paint it to match your kitchen decor, then arrange hooks to hold utensils, pots, mugs, or measuring cups. The beauty of pegboards lies in their flexibility—rearrange hooks whenever you need to accommodate different items.
Magnetic Knife Strips: These sleek strips keep knives accessible and safe while freeing up drawer or counter space. You’ll need a magnetic knife strip (available in wood or stainless steel), a drill, and mounting screws. Install the strip on any empty wall section, ensuring it’s at a comfortable height and away from the cooking zone where items might fall into hot surfaces. Beyond knives, these strips can also hold metal utensils, scissors, or even small spice tins with metal lids.
Cabinet Door Spice Racks: The inside of cabinet doors represents prime real estate that often DIY kitchen island ideas goes unused. Purchase or build simple wooden racks with small lips to hold spice jars. You’ll need thin boards, wood glue, small nails, and adhesive mounting strips or small hinges if you prefer removable racks. Measure the interior door space carefully, cut boards to size, create small shelves with lips, and attach them to the door using heavy-duty adhesive strips or screws. This keeps spices organized, visible, and readily accessible without taking up shelf space.
Clever Corner & Nook Innovations
Corners and awkward spaces are notorious storage black holes in small kitchens, but with some DIY ingenuity, they can become valuable storage assets.
Pull-Out Corner Shelves: Lower corner cabinets often waste significant space due to their depth and difficult access. Creating a pull-out shelf system solves this problem. You’ll need plywood cut to fit your cabinet dimensions, drawer slides rated for the weight you’ll store, screws, and a drill. Measure the cabinet interior carefully, accounting for the door swing. Cut plywood into two semicircular or L-shaped platforms, attach heavy-duty drawer slides to the cabinet sides and shelf bottoms, and install so the shelves glide smoothly outward. This transforms dead corner space into accessible storage for pots, pans, or small appliances.
Diagonal Corner Shelving: For upper corners, consider installing diagonal floating shelves that bridge the corner gap. This requires triangular-cut wood pieces, corner brackets specifically designed for diagonal installation, and basic mounting hardware. These shelves work beautifully for displaying cookbooks, decorative items, or storing items you use less frequently. The diagonal orientation makes items easier to reach than traditional corner shelves while adding visual interest.
Above-Refrigerator Storage: The space above your refrigerator often sits empty or becomes a dust collector. Build a simple open shelf or enclosed cabinet to utilize this area. For a basic shelf, you’ll need a board cut to width, two brackets, and mounting hardware. For something more substantial, consider building a simple box frame that matches your existing cabinets. This space works well for storing appliances you use occasionally, extra pantry items, or entertaining pieces.
Narrow Gap Solutions: Those slim spaces between appliances or cabinets can accommodate rolling storage. Create a narrow pull-out pantry using a piece of plywood, caster wheels, small shelves or baskets, and a handle. Build a frame that’s slightly narrower than the gap, attach wheels to the bottom, add shelves at various heights for bottles, cans, or cutting boards, and install a handle on the visible edge for easy access.
Under-Cabinet & Below-Sink Miracles
The areas beneath your cabinets and sink offer significant storage potential that’s often poorly organized or completely wasted.
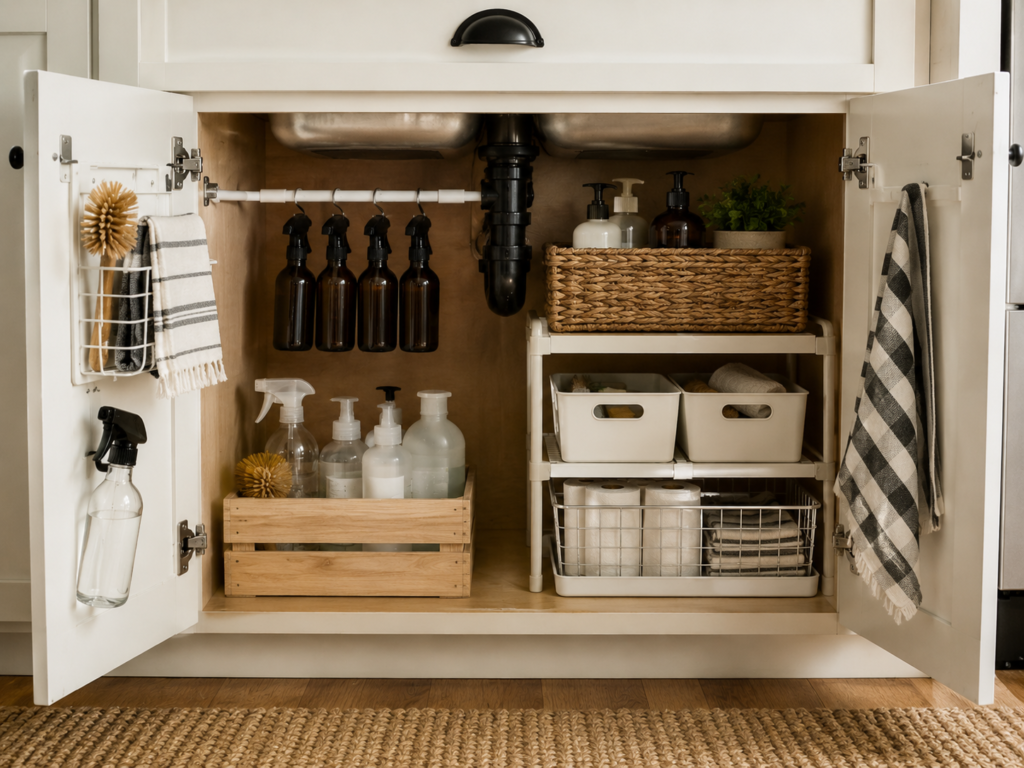
Under-Sink Organization: The cabinet under your sink typically houses plumbing that creates obstacles, but you can work around it. Install a tension rod near the front of the cabinet to hang spray bottles by their triggers, freeing up floor space. Build or purchase stackable shelving units that fit around pipes—you can create custom ones using small plastic bins on risers made from PVC pipe cuts. Add adhesive hooks to the cabinet door interior for storing gloves, scrub brushes, or dish towels. Consider using a small tension curtain rod to create a hanging storage system for cleaning cloths.
Pull-Out Trash System: A hidden trash can keeps your kitchen looking tidy. You’ll need a trash bin that fits your cabinet width, drawer slides rated for the weight of a full trash bag, mounting brackets, and screws. Attach a platform or frame to the bin, install drawer slides inside the cabinet, and mount the bin assembly so it glides out smoothly when you open the door. Some designs include dual bins for trash and recycling, helping households separate waste more efficiently while keeping the kitchen organized. Understanding the benefits of recycling can also encourage better waste management habits and make it easier to maintain an eco-friendly home.
Sliding Lower Cabinet Shelves: Standard lower cabinets force you to crouch and reach into dark depths for items in back. Installing sliding shelves brings everything within easy reach. Purchase or build shelves sized to fit your cabinet interiors, buy full-extension drawer slides for each shelf, and install them at heights that maximize your cabinet’s vertical space. These work exceptionally well for pots, pans, mixing bowls, and small appliances.
Tiered Pot and Pan Storage: Create vertical storage within lower cabinets using adjustable dividers or a DIY tiered system. Using thin plywood or pegboard, build vertical slots that allow you to store pans on their sides rather than stacked. This prevents the frustrating avalanche that occurs when you need the bottom pan from a stack. Alternatively, install tension rods vertically inside cabinets to create dividers for baking sheets and cutting boards.
Repurposing & Upcycling for Budget-Friendly Storage
Some of the most creative and cost-effective storage solutions come from reimagining items you already own or can find inexpensively at thrift stores.
Wooden Crate Storage: Old wooden crates make excellent open shelving units. Sand them smooth, apply paint or stain, and mount them to walls as individual shelves or stack them to create a modular shelving unit. They’re perfect for storing produce, cookbooks, or kitchen linens. Secure stacked crates with wood glue and corner brackets for stability.
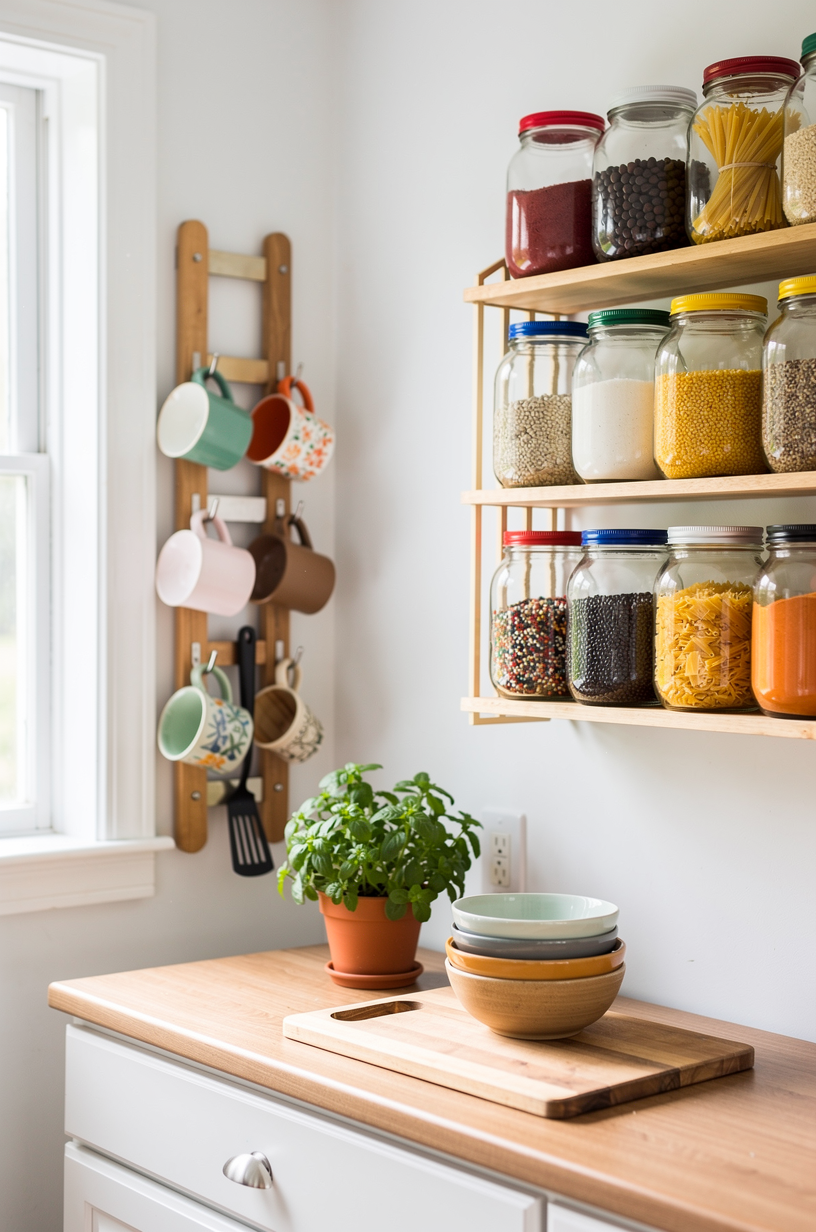
Mason Jar Organization: Mason jars aren’t just for canning—they’re excellent for storing dry goods, utensils, or craft supplies. Mount jar lids under floating shelves or cabinets using small screws, then screw jars into the lids for hanging storage that displays contents clearly. On countertops or shelves, use jars to organize frequently used items like cooking utensils, wooden spoons, or coffee accessories.
Tin Can Utensil Holders: Clean tin cans covered in decorative paper, paint, or fabric make charming utensil holders. Remove labels, sand any sharp edges, and decorate as desired. Group several cans in a shallow tray for a cohesive look, or mount them to a board to hang on the wall for vertical storage.
Rolling Cart Transformations: An old bar cart, filing cabinet on wheels, or even a small bookshelf with added casters can become mobile kitchen storage. Paint or refinish the piece to match your decor, add baskets or bins for organized storage, and use the top surface for food prep or as additional counter space. The mobility allows you to DIY kitchen renovation steps tuck it away when not needed or roll it wherever you’re working.
Ladder Pot Rack: An old wooden ladder suspended from the ceiling creates rustic storage for hanging pots, pans, and utensils. Sand and seal the ladder, install heavy-duty ceiling hooks rated for the weight, and hang the ladder horizontally. Add S-hooks along the rungs for hanging items. This works especially well in kitchens with high ceilings.
Vintage Drawer Organizers: Old cutlery trays, drawer dividers, or even ice cube trays can organize small items in drawers, preventing the dreaded junk drawer effect. Mix and match vintage pieces for an eclectic look that’s both functional and charming.
Smart Drawer & Pantry Optimization
The interiors of your existing drawers and pantry shelves often hold untapped organizational potential that DIY solutions can unlock.
Custom Drawer Dividers: Rather than purchasing expensive drawer organization systems, create custom dividers using thin plywood, foam board, or even sturdy cardboard covered in contact paper. Measure your drawer dimensions, plan compartments for utensils, gadgets, or foils and wraps, cut dividers to size, and install them using small brackets or strong adhesive. Adjustable dividers made from spring-tension rods placed vertically can also create flexible compartments that adapt as needs change.
Tiered Spice Risers: In pantries or deep cabinets, seeing what’s in the back row is nearly impossible. Build simple risers using wood blocks and small shelves to create stadium-style seating for spice jars, canned goods, or bottles. You’ll need wood pieces cut to 3-4 inches high for risers, boards for the shelf tops, wood glue, and optionally small nails for reinforcement. This makes every item visible at a glance.
Vertical Baking Sheet Storage: In deep drawers or cabinets, store baking sheets, cutting boards, and trays vertically using DIY dividers. Cut pieces of plywood to the height of your drawer or cabinet, create slots spaced 1-2 inches apart, and install the divider system. This prevents items from stacking and makes grabbing a single pan effortless.
Pull-Out Pantry Shelves: For pantries with deep shelves, install sliding platforms similar to those recommended for lower cabinets. This brings items from the back within easy reach and prevents food from being forgotten and expiring. The University of Minnesota Extension offers excellent guidance on kitchen storage principles at https://extension.umn.edu/housing-and-home/kitchen-storage, which can help you plan effective pantry organization.
Bag and Foil Organizers: Create a dedicated space for plastic wrap, aluminum foil, and plastic bags using a narrow magazine file mounted inside a cabinet door or on its side within a drawer. Alternatively, build a simple box with dividers to keep these items separate and accessible.
Finishing Touches & Maintenance for Lasting Organization
Once your DIY storage projects are complete, proper finishing and maintenance ensure they remain functional and attractive for years to come. Sand all wood surfaces smooth before applying paint, stain, or sealant to prevent splinters and create a professional appearance. For kitchen storage, use water-resistant finishes that can withstand humidity and occasional splashes. Consider adding cabinet liner to shelves for easier cleaning and a polished look. Label containers, jars, and bins clearly so family members can maintain your organizational system.
Establish a routine for reassessing your storage needs every few months—kitchens are dynamic spaces, and what works initially may need adjustment. Practice regular decluttering by removing items you haven’t used in six months. When working on DIY projects, always prioritize safety: wear protective eyewear when cutting or drilling, ensure shelves are properly anchored to studs for weight-bearing applications, use appropriate hardware rated for the load, and keep electrical outlets accessible and unobstructed. Well-maintained DIY storage solutions can kitchen island storage last for many years while keeping your small kitchen functional and organized.
Frequently Asked Questions
What are the most effective DIY storage solutions for extremely small kitchens?
For extremely small kitchens, focus on vertical storage solutions that don’t consume floor space. Wall-mounted pegboards, magnetic strips, floating shelves, and over-the-door organizers provide significant storage without reducing your limited square footage. Rolling carts offer mobile storage and additional work surfaces that can be tucked away when not in use. Under-cabinet storage solutions like hanging baskets or mounted paper towel holders keep counters clear while utilizing overlooked spaces.
How can I add storage to my kitchen without drilling into walls?
Renter-friendly and no-drill options include tension rod systems for hanging storage, adhesive hooks and strips rated for kitchen use, over-the-door organizers for pantry items or cleaning supplies, freestanding shelving units, magnetic solutions for metal surfaces, and furniture pieces like baker’s racks or carts. Command strips and removable adhesive products have become increasingly strong and reliable for lightweight to medium-weight applications, making them excellent choices for temporary installations.
What budget-friendly materials can I use for DIY kitchen organizers?
Repurposed materials offer the best value: wooden crates from craft stores or farmers markets, reclaimed wood from pallets, mason jars for dry storage, tin cans covered decoratively, cardboard boxes reinforced and covered with contact paper, PVC pipes cut for dividers or risers, and tension rods for creating compartments. Shopping at thrift stores, habitat restoration stores, or online marketplaces can yield inexpensive baskets, containers, and furniture pieces perfect for kitchen organization projects. Basic pine boards from hardware stores remain affordable and easy to work with for simple shelving projects.
Are there rental-friendly DIY storage ideas for kitchens?
Absolutely! Focus on solutions that don’t require permanent modifications: adhesive-mounted organizers, freestanding shelving units, furniture pieces with storage like kitchen islands on wheels, over-the-door systems, magnetic organizers, and tension rod applications. Inside cabinets and drawers, you can install any organizational system without landlord concerns since these areas aren’t visible and don’t affect the structure. Removable hooks, strips, and brackets designed specifically for renters have become widely available and work remarkably well for lightweight storage needs.
How do I ensure my DIY kitchen storage projects are durable and safe?
Safety and durability begin with proper planning and materials selection. Always mount wall-hung storage to wall studs rather than just drywall, using appropriate anchors if studs aren’t available in your desired location. Choose hardware rated for the weight you’ll be storing, adding a safety margin of at least 25%. Sand all wooden surfaces to prevent splinters, and seal wood with appropriate finishes to resist moisture and staining. Ensure floating shelves are level and properly supported, and test weight capacity gradually before loading fully. For overhead storage, use extra caution and slightly overestimate weight requirements when selecting mounting hardware. Keep heavier items on lower shelves to prevent tip-overs, and secure tall or freestanding units to walls if possible.
Conclusion
Transforming a small kitchen into an organized, functional space doesn’t require a complete remodel or professional contractor—just creativity, basic tools, and a willingness to think vertically and unconventionally. The DIY storage solutions outlined in this guide offer practical, budget-friendly ways to maximize every inch of your compact cooking space. By implementing vertical storage, optimizing corners and hidden spaces, repurposing everyday items, and customizing drawer and pantry organization, you can dramatically increase your kitchen’s capacity while maintaining style and accessibility.
Remember that the best storage system is one tailored to your specific needs and cooking habits, so don’t hesitate to modify these ideas to suit your space. Start with one or two projects that address your most pressing storage challenges, then build on your success. With these DIY solutions, your small kitchen can become a model of efficiency and organization that makes meal preparation a pleasure rather than a frustration. Happy organizing!