Your junk drawer is hiding a secret stash of art supplies. Those dried-out markers you’ve been meaning to toss? They’re about to become your new favorite budget-friendly watercolors, and repurposing old markers into watercolor paint is easier than you think.
Before you reach for expensive watercolor sets or send another handful of markers to the landfill, consider this: those seemingly useless markers still contain plenty of pigment. The felt tip might be dry, but the ink reservoir inside is full of color just waiting for a second life. This simple DIY transforms what would be trash into vibrant, blendable paints that rival store-bought versions—all while saving you money and keeping plastic out of landfills.
The magic of this eco-friendly craft lies in its simplicity. You’re not creating something complicated or requiring special skills. You’re extracting the existing ink and giving it a new form. It’s the perfect introduction to sustainable crafting practices that teach kids about resourcefulness while delivering instant creative gratification.
What makes this project particularly appealing is the dual benefit: you’re solving the problem of dried-out markers cluttering your craft space while creating a custom paint palette that costs virtually nothing. Parents and teachers especially love this approach because it turns a common household frustration into an engaging activity that sparks creativity and environmental awareness simultaneously.
Simple Supplies You Already Have at Home
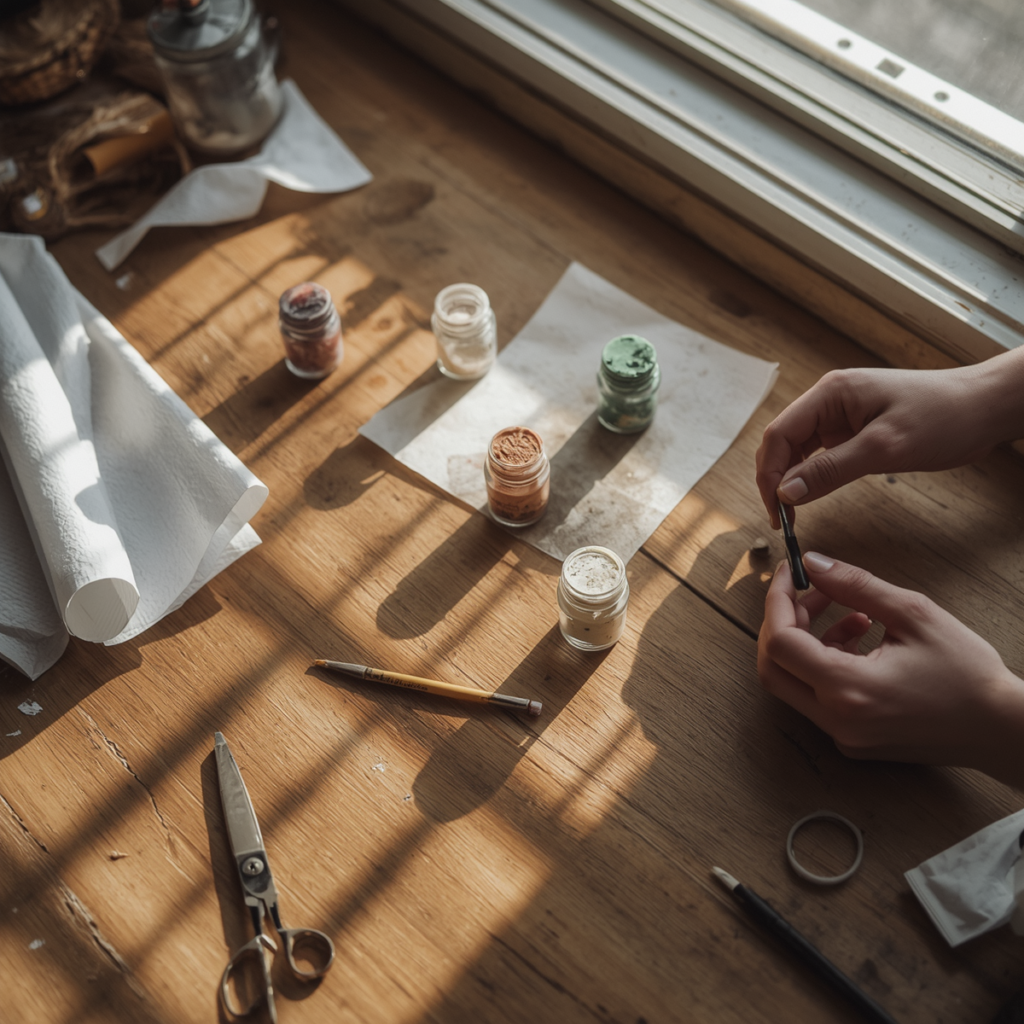
Gathering your supplies takes less than five minutes, and chances are you already have everything on hand. The beauty of this project is its accessibility—no trips to specialty craft stores required.
Here’s your simple materials list:
- Old dried-out markers (Crayola washable markers work wonderfully, but most water-based markers will do)
- Small containers or jars (baby food jars, pill bottles, or even bottle caps work perfectly)
- Warm water
- Scissors or pliers for opening markers
- Paper towels for any spills
- Optional: small paintbrushes for testing your new paints
The type of marker matters more than you might expect. Water-based markers, especially washable varieties designed for kids, break down most easily in water. Permanent markers won’t work for this technique since their alcohol-based inks don’t mix well with water. If you’re unsure whether your markers are water-based, check the label for terms like “washable” or “non-toxic water-based ink.”
Container size affects your paint concentration. Smaller containers like bottle caps create more saturated, vibrant colors, while larger jars produce lighter, more translucent washes. Starting with a variety of sizes lets you experiment with different color intensities without committing to one approach.
Repurposing Old Markers Into Watercolor Paint at Home
Now comes the satisfying part: watching those old markers transform right before your eyes. This process is safe enough for kids to help with, though adult supervision is recommended for the marker disassembly step.
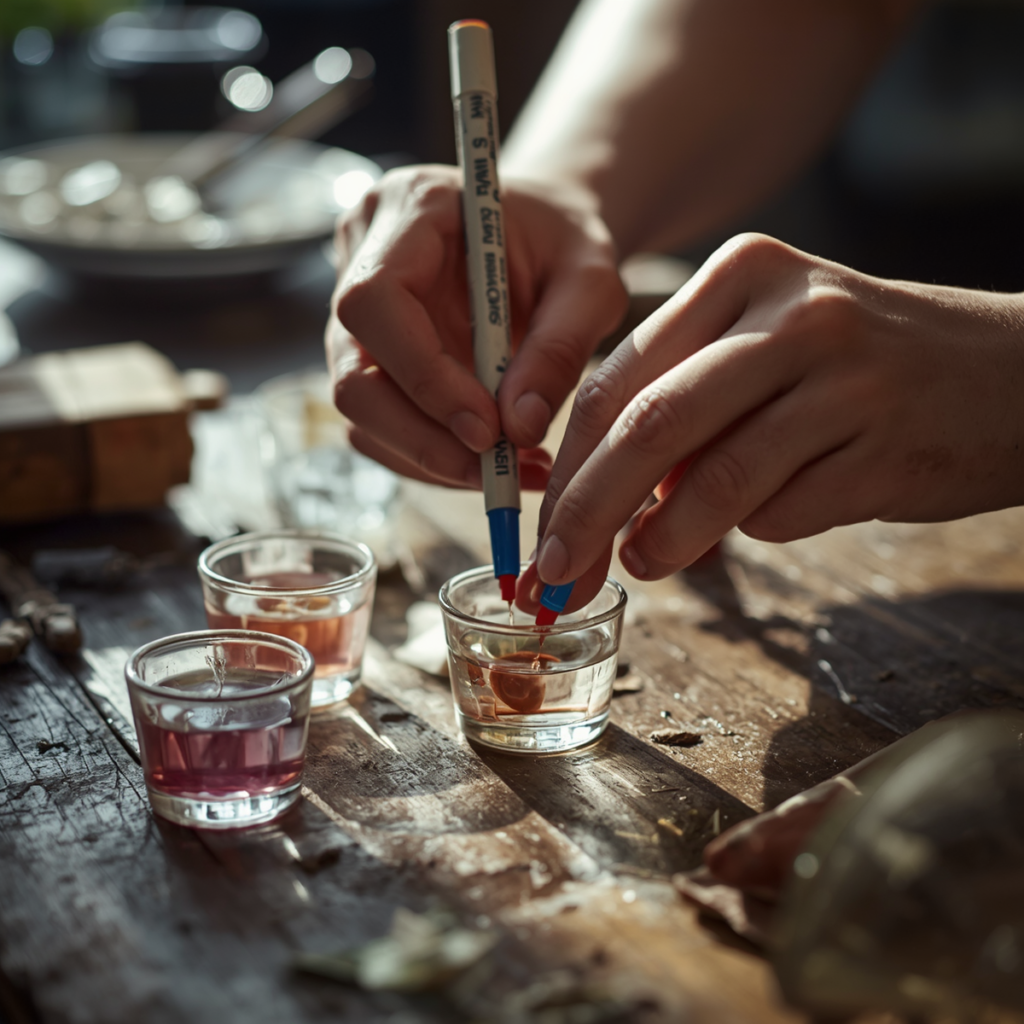
Start by carefully removing the marker casing. Most markers pop apart easily if you pull firmly on the tip while twisting the barrel. For stubborn ones, use pliers to grip the end and gently pull. Inside, you’ll find the felt tip attached to a longer ink-soaked core—this is your pigment goldmine.
Drop the entire ink core into your chosen container. If you’re working with particularly dried-out markers, you might want to cut the core into smaller pieces to expose more surface area, which speeds up the color release. Recycle markers into watercolors by adding just enough warm water to cover the ink core completely. Warm water works faster than cold, but don’t use boiling water as it can sometimes affect the pigment quality.
The waiting game begins, but it’s remarkably short. Within 10 to 15 minutes, you’ll notice the water taking on rich color as the ink disperses. For deeper, more saturated paints, let the cores soak for several hours or even overnight. Some crafters leave their cores in permanently, topping up with water as needed to maintain the desired consistency.
Give each container a gentle swirl every few minutes during the initial soaking period. This helps distribute the pigment evenly throughout the water. You’ll know your paint is ready when the color looks uniform and reaches the intensity you want.
Perfecting Your Paint Consistency
The concentration of your watercolors determines their versatility. Too watery, and you’ll get barely-there washes. Too concentrated, and the paint won’t flow smoothly on paper.
Test your paint on scrap paper before diving into a project. The color should glide on smoothly and maintain vibrancy even when dry. If it’s too light, remove some water with a clean sponge or paper towel, or add another marker core. If it’s too thick and doesn’t spread easily, add water a few drops at a time until you reach the perfect consistency.
Think of it like making tea: steeping time and water ratio control the strength. Starting with less water is always smarter since you can dilute easily but concentrating weak paint requires more patience. Most successful batches use about one tablespoon of water per marker core for a good middle-ground consistency.
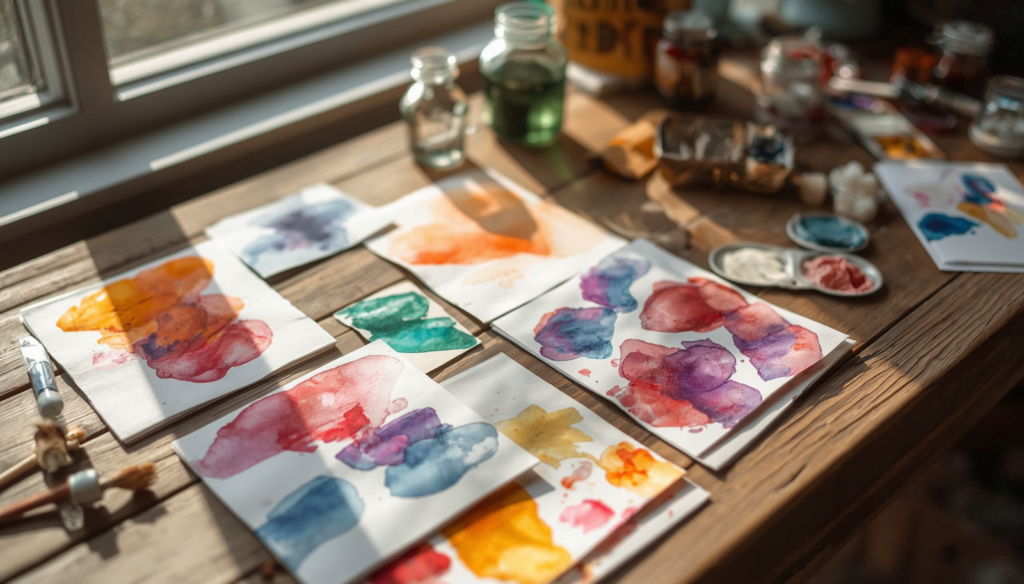
Creative DIY Watercolor Color Mixing Ideas
Once you’ve mastered basic color extraction, the real fun begins. Creating custom colors through blending transforms your recycled markers into a truly personalized paint collection that addresses one of the key benefits of this eco-friendly approach.
Mix cores from different colored markers in the same container to create entirely new shades. A red and yellow core together produce beautiful oranges. Blue and red create purples ranging from lavender to deep violet depending on the ratio. Start with equal parts and adjust based on results.
For more control over blending, create individual color batches first, then mix small amounts of the finished paints together. This method lets you test combinations without committing entire containers to experiments that might not work out. Keep notes on successful ratios so you can recreate favorite custom colors later.
Layering techniques open up even more possibilities. Simple watercolor techniques for beautiful results work just as well with your recycled paints. Let one color dry completely before adding another on top to create depth and dimension. Light washes layered over darker ones create luminous effects that look sophisticated and intentional.
Making Your Paints Last
Proper storage extends the life of your homemade watercolors indefinitely. These paints won’t spoil or separate like some commercial varieties, making them wonderfully low-maintenance.
Keep your containers tightly sealed when not in use to prevent evaporation. Small jars with screw-top lids work better than open containers. If you’re using bottle caps or shallow dishes for immediate projects, plan to use the paint within a day or two before it dries out.
Store your paint collection in a cool, dry place away from direct sunlight. While the pigments are fairly stable, prolonged sun exposure can cause some colors to fade over time. A craft drawer or cabinet works perfectly.
If your paint does dry out, don’t panic. Simply add a few drops of warm water and stir. The pigment reactivates easily, returning to its original consistency. This reusability factor makes your recycled watercolors even more economical than traditional paints.
The Environmental and Budget Impact
Beyond the immediate creative satisfaction, repurposing old markers into watercolors delivers significant environmental benefits that align with growing concerns about craft supply waste.
The average American household throws away approximately 200 markers annually. Most end up in landfills where the plastic casings take hundreds of years to decompose. By reclaiming just the markers in your own home, you’re diverting pounds of plastic from the waste stream while teaching valuable lessons about resourcefulness.
The financial savings add up quickly too. A basic watercolor set costs anywhere from $8 to $20, while this DIY version costs exactly nothing if you’re using markers you already own. For families with kids who go through art supplies rapidly, or teachers managing classroom budgets, these savings become substantial over time.
Sustainable crafting practices like this one demonstrate that eco-friendly choices don’t require sacrifice or extra expense. In fact, they often spark more creativity precisely because they encourage experimentation without the pressure of wasting expensive materials.
Troubleshooting Common Issues
Even with straightforward instructions, you might encounter a few hiccups. Knowing how to address them keeps frustration at bay and ensures successful results.
If your colors look muddy or dull after extraction, the marker was likely too dried out to yield quality pigment. Try using markers that stopped working more recently rather than ones that have been sitting in a drawer for years. Fresher markers contain more moisture in their cores, producing clearer, more vibrant colors.
Uneven color distribution usually means the ink core needs more time to release its pigment. Patience pays off here. Let it soak longer, or try gently squeezing the core with clean fingers to help release trapped ink. Some crafters cut cores lengthwise to expose more interior surface area.
If paint isn’t adhering well to paper, you’ve likely created too diluted a mixture. Remove some water or add another core. Alternatively, the paper itself might be the issue—watercolor paper or heavier cardstock works much better than regular printer paper, which tends to buckle and pill when wet.
Fun DIY Projects Using Homemade Watercolor Paint
Now that you’ve created this custom paint collection, put it to work. These recycled watercolors perform beautifully across various projects, from simple to sophisticated.
Greeting cards offer the perfect small-scale canvas for testing techniques and color combinations. The personal touch of hand-painted cards makes them infinitely more meaningful than store-bought versions. Kids especially love creating custom birthday cards for friends using paints they made themselves.
Watercolor bookmarks combine practicality with artistry. Paint abstract washes or simple designs on heavy cardstock, let dry completely, then laminate for durability. These make thoughtful gifts that showcase your resourcefulness and creativity.
For those interested in expanding their upcycling skills beyond art supplies, upcycling old outfits applies similar sustainable principles to fashion. The mindset of seeing potential in what others discard translates beautifully across creative disciplines.
Journal pages and art journals benefit from the loose, flowing nature of watercolors. Create background washes for bullet journal spreads or paint directly over written text for an artistic layered effect. The translucency of watercolors makes them ideal for mixed-media work.
Teaching Kids About Sustainability Through Crafting
This project serves as a powerful educational tool that goes far beyond simple arts and crafts. It’s a hands-on lesson in environmental responsibility that kids actually enjoy.
Children grasp abstract concepts like recycling and sustainability much better through direct experience. Watching markers they thought were garbage transform into functional art supplies makes the concept of waste reduction tangible and exciting. It shifts their perspective from seeing trash as useless to recognizing hidden potential in everyday items.
The process also builds problem-solving skills and scientific thinking. Kids learn about color theory through blending, observe how pigments dissolve in water, and experiment with ratios to achieve desired results. These hands-on discoveries stick with them far longer than textbook lessons.
Parents and educators can extend the learning by discussing where markers go when thrown away, how long plastic takes to decompose, and what other household items might be repurposed. Creative DIY projects for kids reinforce these lessons while building confidence and encouraging innovative thinking.
Expanding Your Repurposing Skills
Once you’ve mastered marker-to-watercolor conversion, a whole world of creative repurposing opens up. The same resourceful mindset applies to countless other craft supplies and household items.
Dried-out gel pens can be revived using similar techniques, though they require rubbing alcohol instead of water due to their ink formulation. Old crayons melt down into custom shapes using silicone molds. Even broken eyeshadows can be pressed back together or transformed into custom nail polishes.
The key is approaching every “empty” or “broken” item with curiosity rather than immediately discarding it. What seems useless in its current form might be perfect for something else. This shift in thinking reduces waste while fueling creativity and saving money simultaneously.
Seasonal crafting offers regular opportunities to apply these skills. DIY seasonal decorations using repurposed materials combine festive creativity with sustainable practices. The satisfaction of creating something beautiful from what others would throw away never gets old.
Embracing the Imperfect and Experimental
One of the most liberating aspects of making your own art supplies is removing the pressure of perfection. These paints cost nothing, so experimenting feels risk-free and genuinely fun.
Not every color will turn out as expected, and that’s perfectly fine. Sometimes the most interesting shades come from unexpected combinations or markers you thought wouldn’t work. Embrace the variations and unique qualities of your homemade paints rather than trying to replicate commercial products exactly.
The slight unpredictability adds character to your artwork. Handmade supplies have personality and story behind them that factory-made versions can’t match. When someone asks about your painting and you explain you made the paints from old markers, it becomes a conversation starter that highlights your creativity and environmental consciousness.
This experimental mindset extends beyond the craft table. It teaches adaptability, resourcefulness, and the confidence to try new approaches without fear of failure. These life skills prove valuable far beyond art projects, shaping how we approach problems and opportunities in all areas of life.
Repurposing old markers into watercolor paint proves that sustainable crafting doesn’t mean compromising on quality or fun. You’re creating custom art supplies that perform beautifully while keeping plastic out of landfills and money in your pocket. Whether you’re a parent looking for engaging kids’ activities, a teacher stretching classroom budgets, or simply someone who loves finding creative solutions to everyday problems, this simple technique delivers satisfaction on multiple levels. So raid that junk drawer, gather those dried-out markers, and discover just how much creative potential you’ve been throwing away. Your next masterpiece might be hiding in what you almost discarded.