A well-organized kitchen transforms your daily cooking experience, making meal preparation faster, more enjoyable, and less stressful. But achieving that picture-perfect organized space doesn’t require expensive specialty products or a complete kitchen renovation. With some creativity, common household items, and a weekend afternoon, you can implement practical DIY kitchen organization hacks that maximize every inch of your space while staying within budget. Whether you’re working with a spacious culinary haven or a compact galley kitchen, these hands-on solutions will help you create a functional, organized space that reflects your personal style and meets your specific needs.
Why DIY? The Benefits of Hands-On Kitchen Organization
Embracing DIY kitchen organization offers far more than just a tidier space—it’s an opportunity to save money, express creativity, and make environmentally conscious choices. When you create your own organizational solutions, you’re not paying for fancy packaging or brand names, which means you can achieve professional-looking results for a fraction of retail costs. Custom-made organizers fit your exact space dimensions and workflow, something off-the-shelf products rarely deliver.
The sustainability aspect of DIY organization cannot be overstated. By repurposing items you already own—cardboard boxes, glass jars, old wooden crates—you’re actively reducing waste and giving new life to materials that might otherwise end up in landfills. According to the EPA’s waste reduction guidelines, reusing and repurposing materials significantly reduces environmental impact.
There’s also profound satisfaction in creating something functional with your own hands. Understanding why we organize things and how it affects our behavior reveals that the act of organizing itself can reduce stress and increase productivity. When you’ve personally crafted your kitchen’s organizational system, you’re more likely to maintain it because you’ve invested time and thought into its creation. Plus, DIY solutions can evolve with your needs—easily modified or upgraded without guilt about wasting expensive purchases.
Smart Drawer & Cabinet Organizers You Can Make
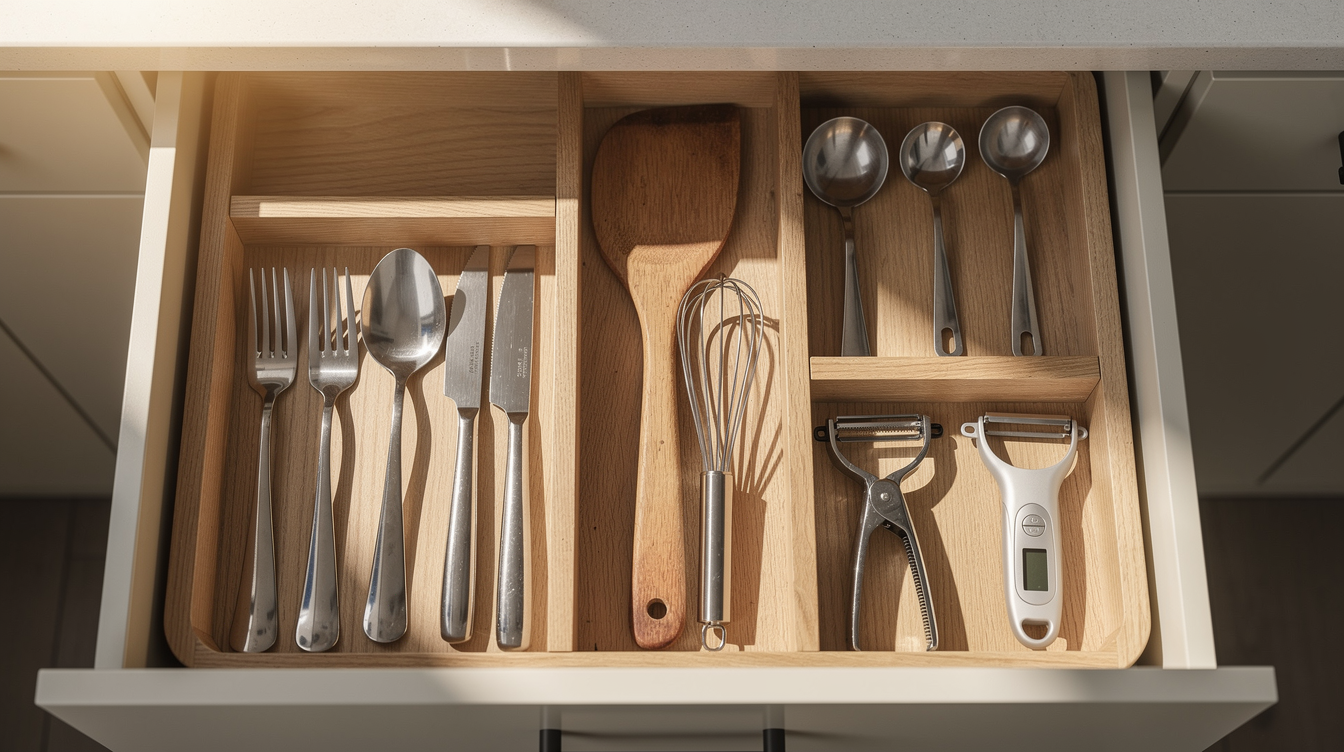
Drawers and cabinets often become chaotic catch-alls, but with simple DIY organizers, you can transform these spaces into models of efficiency. Start with your utensil drawer, which typically suffers from constant mixing and jumbling. Rather than purchasing plastic dividers, create custom sections using sturdy cardboard from shipping boxes. Measure your drawer’s dimensions, cut cardboard strips to the appropriate height, and create a grid pattern by slotting perpendicular pieces together through small cuts at the midpoints. Cover the cardboard with contact paper or wrapping paper for a polished look that’s easy to clean.
For the notorious “wrap and foil” cabinet, repurposed cereal boxes work brilliantly. Cut cereal boxes diagonally to create magazine-holder style organizers, then position them horizontally in your cabinet. These perfectly sized holders keep plastic wrap, aluminum foil, and parchment paper rolls standing upright and accessible. You can even use top DIY kitchen hacks several smaller boxes for storing sandwich bags and food storage containers by their sizes.
Under-sink cabinets present unique challenges with their plumbing obstacles. Install an inexpensive tension rod (or two) between the cabinet walls to create vertical storage for spray bottles, which can hang by their triggers. This frees up floor space for bins or baskets below. Another tension rod hack involves using them to hold cutting boards vertically against the cabinet door or side wall, creating a filing system that keeps boards separated and prevents warping.
For deep cabinets where items get lost in the back, create pull-out platforms using old wooden cutting boards or pieces of plywood attached to drawer slides from the hardware store. This simple addition brings back-of-cabinet items within easy reach. Alternatively, use lazy Susans made from upcycled cake stands or round wooden pieces mounted on bearing hardware, perfect for corralling oils, vinegars, or baking supplies.
Pantry Perfection: Affordable Hacks for an Organized Food Hub
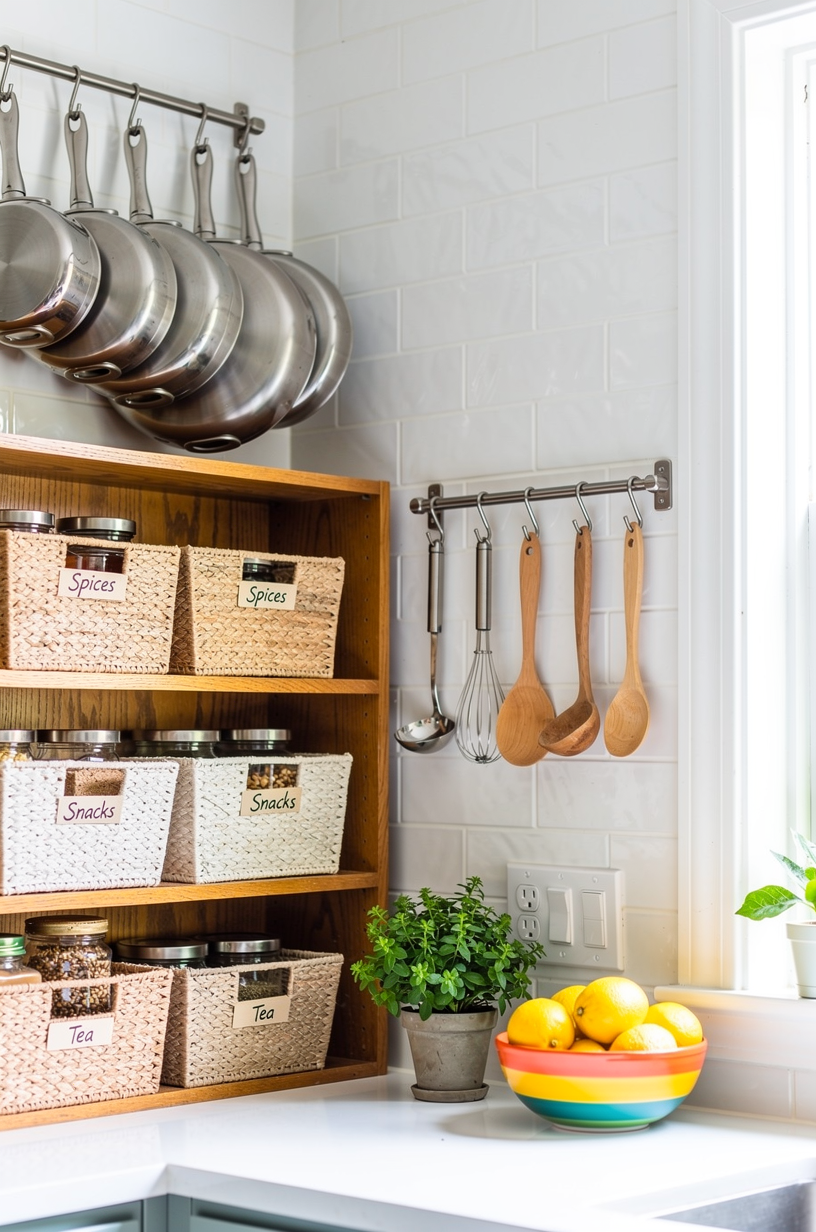
A well-organized pantry makes meal planning effortless and prevents food waste by keeping everything visible and accessible. If you’re working with limited space, think vertically. Create a DIY spice rack using an old wooden pallet: sand it smooth, mount it horizontally on the wall, and use the natural slats to create shelves for spice jars. This rustic solution adds character while keeping dozens of spices organized and visible at eye level.
Glass jars become your best friends for pantry organization. Save pasta sauce jars, pickle jars, and any other clear containers with tight-fitting lids. Remove labels with hot water and scrubbing, then use these free containers for bulk goods like rice, pasta, beans, flour, and sugar. For a cohesive look, create uniform labels using masking tape and a permanent marker, or print matching labels on cardstock. This simple hack not only looks beautiful but also helps you quickly identify ingredients and DIY storage solutions assess inventory levels at a glance.
Magazine files and old shoeboxes work wonderfully for corralling packets, seasoning mixes, and tea bags. Cover shoeboxes with decorative paper or paint them to match your pantry aesthetic. Stand them on shelves like drawers, grouping similar items together—one for baking mixes, another for soup packets, another for instant meals. This prevents the dreaded avalanche when you remove one item from a pile.
Don’t overlook door space in your pantry. Create a hanging organizer using clear plastic shoe organizers or small wire baskets attached with command strips. These work perfectly for storing snack bars, sauce packets, or small items that otherwise get lost. For deeper pantries, consider using wire cooling racks positioned vertically as dividers between different categories of canned goods, creating organized sections without expensive shelf dividers.
Countertop Clutter Control: DIY Solutions for Everyday Items
Countertops often attract clutter like magnets, yet keeping them clear is essential for both functionality and aesthetics. The key is creating designated homes for items you use daily without creating more visual chaos. A DIY tiered stand made from plates and candlesticks (or sturdy cups) creates vertical storage for fruits, frequently used spices, or coffee supplies. Simply attach plates to candlesticks or cups using strong adhesive, creating two or three levels. This vintage-inspired solution is both functional and decorative.
For knife storage, a wooden magnetic strip offers a space-saving alternative to bulky knife blocks. While you can purchase these inexpensively, mounting is a simple DIY project requiring only a drill and appropriate wall anchors. Position the strip away from high-traffic areas and ensure it’s mounted into studs for maximum safety. This solution keeps knives visible, accessible, and safely stored while freeing up valuable counter real estate.
Small baskets, trays, and bowls become powerful organization tools when used strategically. Designate a shallow tray near the stove for cooking oils, salt, and pepper—items you reach for during every meal. Use a small organize your home basket near the coffee maker to corral filters, spoons, and sweeteners. The key is keeping these collections intentional and minimal; if the basket overflows, it’s time to reassess what truly needs countertop real estate.
A simple DIY utensil holder can be made from cleaned tin cans covered in decorative paper, rope, or fabric. Group several cans together in a small crate or attach them to a small board, creating separate compartments for wooden spoons, spatulas, whisks, and other frequently used tools. This keeps them within arm’s reach while cooking without creating drawer chaos.
Walls & Doors: Unlocking Hidden Storage Potential
When floor and counter space is limited, smart cooks look up and behind. Walls and cabinet doors offer tremendous untapped storage potential that requires minimal investment to utilize effectively. Pegboard systems remain one of the most versatile DIY organization solutions available. Mount a pegboard section on an empty wall, paint it to match your kitchen décor, and use inexpensive hooks and baskets to create custom storage for pots, pans, utensils, and small appliances. The beauty of pegboard lies in its adaptability—simply move hooks around as your needs change.
The inside of cabinet doors represents prime real estate that often goes unused. Install small wire racks or baskets on the inside of doors to store aluminum foil, plastic wrap, and parchment paper boxes. This keeps them accessible while freeing up shelf space for other items. You can also attach measuring cups and spoons to cabinet doors using small command hooks or adhesive-backed hooks, keeping them organized and preventing the tangled mess that often occurs in drawers.
Create a DIY spice organizer on the back of a pantry door using small shelves made from picture ledges or narrow wooden strips. These shallow shelves perfectly accommodate spice jars while using space that would otherwise be wasted. Ensure the shelves have a small lip to prevent jars from falling when the door opens and closes.
For pot lids, which are notoriously difficult to store efficiently, mount command hooks or small towel bars on the inside of cabinet doors. Position lids vertically between pairs of hooks, creating a filing system that keeps them separated and easy to grab. This simple hack can organize a dozen lids in a space that previously held just two or three.
Wall-mounted rails with S-hooks provide another versatile solution, perfect for hanging frequently used pots, pans, colanders, and utensils. Install a simple wooden dowel or metal rail (even a towel bar works) on an empty wall section, then hang items using basic S-hooks from the hardware store. This restaurant-style storage adds character while keeping everyday tools immediately accessible.
Small Kitchen, Big Impact: Maximizing Tiny Spaces with DIY
Small kitchens demand creative thinking and multi-purpose solutions. Every inch counts, so focus on flexible, space-efficient DIY projects that maximize functionality without overwhelming the limited space. Rolling carts offer mobile storage that can be tucked away when not needed. Create an inexpensive version using a small bookshelf mounted on caster wheels, adding a handle if desired. This movable island provides extra prep space, storage, and can roll out of the way during non-cooking times.
Corner spaces often become dead zones in small kitchens. Address this by creating simple lazy Susan platforms from round wooden pieces and bearing hardware, or use wire corner shelves that mount without permanent installation. Even a simple triangular shelf cut from plywood and mounted with brackets can transform an awkward corner into useful storage.
Fold-down solutions work beautifully in tight quarters. Create a fold-down cutting board or workspace using a sturdy wooden board attached to the wall with piano hinges and a supporting chain or bracket. When not in use, it folds flat against the wall, disappearing completely. This provides valuable prep space exactly when you need it without permanent spatial commitment.
Vertical thinking becomes crucial in small kitchens. Stack items strategically using DIY shelf risers made from small boxes, blocks, or even inverted bowls. This creates layers within cabinets, effectively doubling storage capacity. Use adhesive-backed hooks on the sides of cabinets or refrigerators to hang dish towels, oven mitts, or lightweight utensils.
Magnetic strips aren’t just for knives—attach them to the side of your refrigerator or on the wall to hold metal spice tins, kitchen shears, or metal measuring spoons. Small spaces benefit from getting items off surfaces and onto walls, and magnetic storage accomplishes this elegantly while keeping items easily accessible.
Maintaining Your Organized Kitchen: DIY Habits for Lasting Order
Creating organizational systems is only half the battle; maintaining them requires developing simple habits that prevent chaos from creeping back. Implement a “one in, one out” rule for kitchen items—when you acquire a new gadget or dish, remove an old one. This prevents accumulation and forces you to evaluate what truly deserves space in your kitchen.
Schedule brief decluttering sessions monthly, taking just fifteen minutes to reassess what’s working and what needs adjustment. Your DIY systems should evolve with your cooking habits. Create clear labels for all containers and designated spaces; this helps everyone in the household return items to their proper homes. Involve family members in maintaining the organization by assigning specific zones to different people.
Frequently Asked Questions
What are the cheapest DIY kitchen organization hacks?
The most budget-friendly hacks use items you already own. Repurposing cardboard boxes as drawer dividers, using glass jars for pantry storage, and employing tension rods for under-sink organization cost virtually nothing. Command hooks, purchased in multi-packs, provide inexpensive mounting solutions for cabinet doors and walls. Shoebox organizers covered in decorative paper or paint create attractive storage for just the cost of materials you likely have on hand.
How can I organize my kitchen without buying anything new?
Look around your home for repurposing opportunities. Use empty jars for storage, cardboard boxes as dividers, and existing baskets or bins to group similar items. Rearrange what you have by frequency of use—keeping daily items most accessible. Remove duplicate items and things you never use. Often, simply editing your kitchen inventory and thoughtfully arranging what remains creates the organized look you’re seeking without spending a cent.
What are the best DIY solutions for a small kitchen pantry?
For small pantries, maximize vertical space with stacked shelf risers made from small boxes or blocks, use door-mounted organizers for packets and spices, and employ clear jar storage so you can see everything at a glance. Magazine files or covered shoeboxes create pull-out drawer functionality on shelves. Invest in one or two tension rods to create vertical dividers for baking sheets and cutting boards. Group items by category in labeled containers to prevent searching through everything to find one item.
How do I prevent my DIY organizers from looking messy?
Consistency is key. Use similar materials, colors, or labeling styles throughout your kitchen for a cohesive look. Cover cardboard organizers with matching paper or paint. Keep the number of visible containers minimal—store backups elsewhere. Edit ruthlessly, keeping only what you regularly use in prime locations. Clean and maintain your DIY solutions regularly, replacing worn items promptly. Remember that even professional organizers advocate for limiting the variety of container types visible at once for a calmer aesthetic.
What materials are best for DIY kitchen storage projects?
Food-safe glass jars excel for pantry storage. Sturdy cardboard covered with contact paper or fabric works well for drawer dividers and shelf organizers. Wood (new or repurposed) creates durable, attractive solutions for shelves and racks. Metal components like tension rods, S-hooks, and magnetic strips offer strength and longevity. Plastic containers you already own can be repurposed effectively. Avoid materials that can’t be cleaned easily or that might harbor bacteria in a kitchen environment. Always ensure any painted or covered items use non-toxic, food-safe materials when they’ll contact or store food items.
Conclusion
Transforming your kitchen through DIY organization hacks empowers you to create a space that works specifically for your needs, budget, and style. These practical solutions prove that effective organization doesn’t require expensive products or professional organizers—just creativity, common household items, and a willingness to experiment. By repurposing materials you already own and investing minimal amounts in basic supplies, you’ll maximize your kitchen’s potential while contributing to a more sustainable lifestyle. Start with one small project, experience the satisfaction of creating a functional solution with your own hands, and let that success motivate you to tackle the next organizational challenge. Your organized, efficient kitchen awaits, and it’s entirely within your reach to create it yourself.