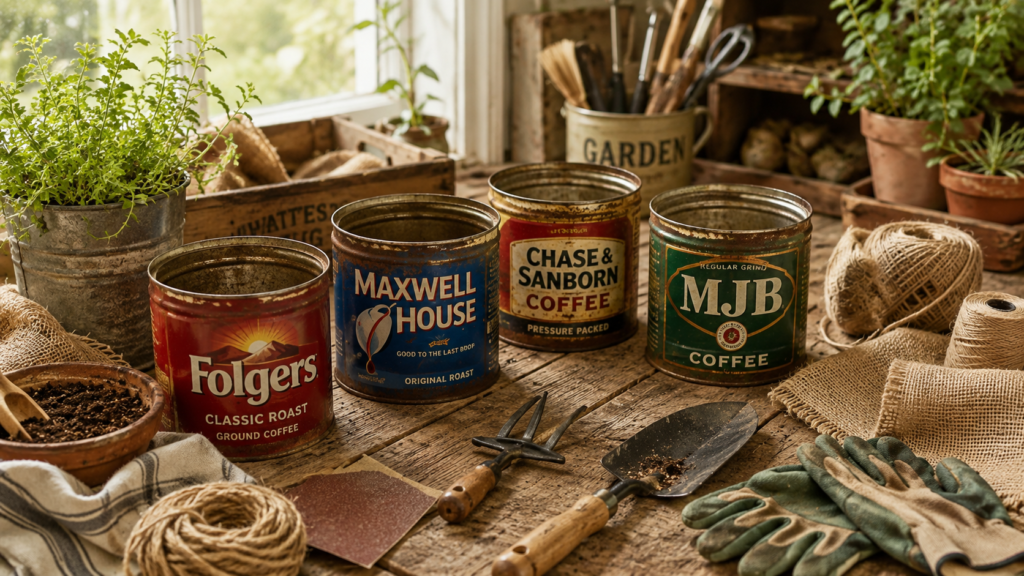
Your morning coffee ritual just got a whole lot more rewarding. Those empty coffee cans tucked in your recycling bin? They’re about to become rustic DIY coffee can planters that’ll add vintage charm to every corner of your home and garden.
Transforming everyday cans into beautiful planters is more than just a crafting project — it’s a celebration of sustainable living and creative expression. When you upcycle metal coffee cans into rustic planters, you’re giving new life to materials that would otherwise end up in a landfill, all while creating one-of-a-kind containers that store-bought options simply can’t match.
Why Rustic DIY Coffee Can Planters Are Perfect for Home and Garden Decor
Coffee cans bring together durability, versatility, and eco-friendly charm in one simple package. Unlike plastic containers that crack over time, metal cans withstand weather changes and last for years. Their uniform cylindrical shape works beautifully with everything from cascading succulents to upright herbs, while their smooth surfaces become blank canvases for your creative vision.
The sustainability factor matters too. Americans discard millions of coffee cans annually, and upcycling in the garden reduces waste while creating functional beauty. By choosing to repurpose rather than purchase new planters, you’re making a small but meaningful choice for the environment.
Metal cans also provide excellent drainage when properly prepared, keeping plant roots healthy and preventing the waterlogged soil that often kills container plants. Their size works perfectly for single herb plants, small flowers, or succulent arrangements — exactly what most indoor and patio gardeners need.
Materials You’ll Need for Your Coffee Can Planters
Gathering your supplies before you start ensures smooth sailing through your DIY project. Most of these items are probably already hiding in your craft closet or garage.
For the basic planter construction, you’ll need clean, empty coffee cans with labels removed, a hammer and nail or drill for drainage holes, and potting soil appropriate for your chosen plants. The can size depends on your project — standard 13-ounce cans work beautifully for herbs and small flowers, while larger 39-ounce containers suit bigger plants.
For that signature rustic aesthetic, collect twine or jute rope, burlap fabric scraps, chalkboard paint or chalk markers for labeling, sandpaper (80-120 grit), and white or cream acrylic paint for distressing. If you’re feeling ambitious, grab some wood stain, lace trim, or small decorative elements such as vintage buttons or metal tags.
Your plant selection matters too. Herbs such as basil, thyme, and rosemary thrive in coffee can planters, as do succulents, small ferns, and compact flowering plants like pansies or petunias. Choose plants with similar light and water needs if you’re creating a grouped display.
Step-by-Step Instructions for Creating Rustic Coffee Can Planters
Preparing Your Cans
Start by thoroughly washing your coffee cans with warm soapy water, making sure to remove any coffee residue that might attract pests. Soak the cans in warm water for 20-30 minutes to loosen labels, then peel them away. Stubborn adhesive comes off easily with a mixture of baking soda and cooking oil — just rub it on, let it sit for five minutes, and wipe clean.
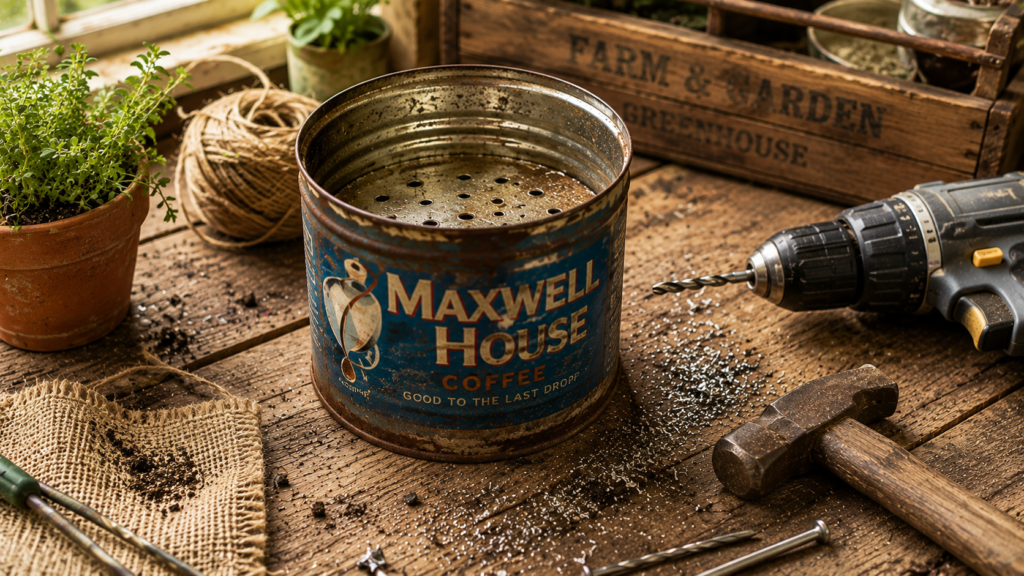
Once dry, flip each can upside down and create drainage holes using a hammer and large nail or a power drill with a 1/4-inch bit. Aim for 4-6 holes evenly spaced across the bottom. This crucial step prevents water from pooling and causing root rot, one of the most common mistakes in container gardening.
For safety, check the top rim for any sharp edges left from the can opener. Gently file down rough spots with sandpaper or carefully fold the edge inward with pliers. If you’re planning to hang your planters, this is also when you’ll want to drill two holes near the top rim for threading wire or rope.
Creating the Rustic Finish
The magic happens when you add texture and patina. For a weathered look, lightly sand the exterior of your can in random patterns, focusing on areas that would naturally show wear — around the rim and bottom edges. This reveals the silver metal beneath any coating and creates authentic vintage character.
Apply a base coat of chalk paint in muted colors such as cream, sage green, or dusty blue. Don’t aim for perfect coverage — uneven application adds to the rustic charm. Let it dry completely, then lightly sand again to distress the paint and create that time-worn appearance. Rustic garden decor embraces imperfection, so embrace those worn spots and natural variations.
For extra dimension, consider a two-tone approach. Paint your base color, let it dry, then apply a second contrasting shade. Once dry, sand through the top layer in spots to reveal glimpses of the first color beneath. This technique mimics the layered patina of truly vintage pieces.
Adding Decorative Elements
Personalization transforms basic cans into statement pieces that reflect your style. Wrap jute twine around the center or rim of your planter, securing it with hot glue at intervals. This textural addition softens the metal and amplifies the rustic aesthetic.
Create plant labels using chalkboard paint. Brush a small rectangular section onto the front of your can, or paint the entire surface for a dramatic matte-black look that you can customize with chalk markers. Write plant names in pretty script, add watering reminders, or include planting dates to track your garden’s progress.
Burlap brings farmhouse charm instantly. Cut strips to wrap around your cans, securing with hot glue or hemp twine. Leave edges raw and frayed for authentic texture. Layer lace trim over burlap for a softer, cottage-garden feel, or add small embellishments such as vintage buttons, miniature clothespins, or metal alphabet stamps.
For a unified look when creating multiple planters, stick to a consistent color palette and similar decorative elements. Varying the application slightly on each piece prevents a cookie-cutter appearance while maintaining cohesion. This approach works beautifully if you’re planning a collection of DIY home projects with matching aesthetics.
Planting and Care Tips
With your beautifully finished rustic planters ready, it’s time to add life. Place a small piece of landscape fabric or a coffee filter over the drainage holes to prevent soil from washing out while still allowing water to escape. This simple liner extends the life of your planter and keeps surfaces beneath clean.
Fill each can about two-thirds full with quality potting mix — not garden soil, which compacts too densely in containers. Choose soil formulated for your plant type: cactus mix for succulents, herb-and-vegetable blend for edibles, or all-purpose potting soil for flowers.
Position your plant at the same depth it was growing in its nursery container, then fill around the roots with additional soil, leaving about half an inch of space below the rim. This gap prevents water from immediately overflowing when you irrigate.
Water thoroughly after planting until you see moisture draining from the bottom holes. Going forward, check soil moisture by inserting your finger an inch deep — if it feels dry, water; if still damp, wait. Overwatering causes more container plant deaths than any other factor.
Placement and Display Ideas
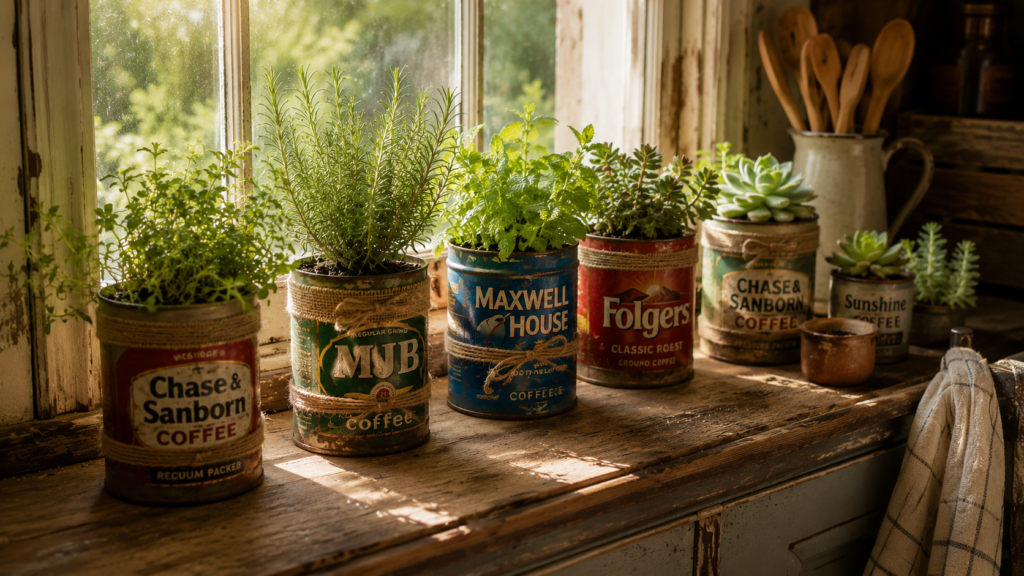
Your coffee can planters deserve spots where their rustic charm shines. Group several together on a weathered wooden tray for a cohesive kitchen windowsill herb garden. Stagger heights by placing some on small wooden blocks or vintage books for visual interest.
Mount cans directly to fence posts or pergola beams using sturdy wire threaded through pre-drilled holes, creating a vertical garden that maximizes space. This technique works especially well for cascading plants such as trailing petunias or string-of-pearls succulents.
For indoor displays, protect furniture surfaces from moisture by placing planters on cork coasters or in shallow trays filled with pebbles. The pebble tray method also increases humidity around plants that appreciate it, such as ferns.
Create seasonal vignettes by surrounding your planters with complementary rustic elements — antique tools, weathered wood, galvanized metal, or natural materials such as pine cones and driftwood. Switch out plants with the seasons: spring bulbs, summer herbs, autumn mums, and winter evergreens keep displays fresh year-round.
Troubleshooting Common Issues
Even straightforward projects sometimes present challenges. If paint isn’t adhering well to your can surface, the metal likely has a waxy coating. Wipe it down with rubbing alcohol before painting, or lightly sand the entire exterior to create tooth for better paint adhesion.
Rust developing on your planters? That’s actually a happy accident for rustic aesthetics, but if you prefer controlled rust, spray cans lightly with a mixture of hydrogen peroxide, white vinegar, and salt, then let them sit outdoors overnight. For rust prevention, seal finished planters with clear matte spray sealer before adding soil and plants.
When plants aren’t thriving, check drainage first. Insufficient holes or blocked openings cause waterlogged roots. Add more drainage holes if needed, and ensure your cans sit where excess water can escape rather than pooling beneath them.
If cans tip easily, especially taller varieties, add weight by placing a layer of small rocks at the bottom before adding soil. This lowers the center of gravity while improving drainage. For outdoor planters in windy locations, secure cans to stable surfaces with waterproof adhesive or wire.
Expanding Your Rustic Planter Collection
Once you’ve mastered basic coffee can planters, the creative possibilities multiply. Not all cans work identically — experiment with different sizes and brands. Larger institutional coffee cans from restaurants or offices create statement planters for bigger plants or multiple smaller ones grouped together.
Tea tins, cocoa containers, and vintage tobacco tins offer varied shapes and interesting original graphics that enhance rustic charm. Creative container ideas extend beyond traditional options, so keep your eyes open at thrift stores and estate sales for unique metal containers.
Coordinate your coffee can planters with other upcycled projects throughout your home. The same distressing techniques work beautifully on glass jars, wooden crates, or fabric items. If you’re exploring more sustainable crafting, consider how upcycling principles apply across different materials, creating a cohesively eco-conscious home.
Try themed collections: all-white distressed cans for a French country look, natural metal with minimal embellishment for industrial farmhouse style, or brightly painted cans with folk-art details for bohemian flair. Each approach creates different moods while using the same basic technique.
Beyond the Basics
Advanced crafters might add stenciled designs using letter stencils and paint pens, découpage vintage seed packet reproductions onto can surfaces, or apply wood veneer strips for mixed-material texture. Metal stamps create permanent impressions directly in the can surface for truly custom labeling.
Create hanging planters by attaching three evenly-spaced lengths of chain or rope to holes punched near the can rim. Use an S-hook or carabiner to hang from porch ceilings, pergolas, or shepherd’s hooks. Macramé hangers designed for jars adapt beautifully to hold decorated coffee cans too.
For outdoor durability, apply several coats of outdoor-rated polyurethane over decorated surfaces. This protects paint and embellishments from weather while maintaining the matte finish that reads as authentically rustic. Reapply annually for continued protection.
Consider creating matching projects that complement your planters. Handmade floral decorations pair beautifully with rustic container gardens, extending your cohesive design aesthetic throughout spaces.
Making Your Planters Last
With proper care, your rustic DIY coffee can planters provide years of service. Bring metal containers indoors during harsh winter freezes if you live in cold climates, as repeated freeze-thaw cycles eventually compromise structural integrity.
Clean planters between plantings by emptying old soil, washing thoroughly with mild soap and water, and letting them dry completely before refilling. This prevents disease transfer between plants and removes salt buildup from fertilizers.
Touch up paint and embellishments as needed. Keep leftover paint and supplies together in a labeled container so refreshing worn spots takes just minutes. This maintenance keeps your collection looking intentional rather than neglected.
Document your favorite combinations with photos. When a particular plant thrives beautifully in a specific planter, you’ll want to remember that pairing. Create a simple garden journal noting which plants worked best in coffee can containers, their care requirements, and seasonal performance.
The beauty of rustic DIY coffee can planters extends far beyond their humble origins. Each one tells a story of creativity, sustainability, and personal style — transforming something disposable into something treasured. Whether you’re cultivating a kitchen herb collection, adding charm to a porch, or gifting handmade planters to friends, you’re creating beauty that matters. Start with one can, see where your creativity leads, and watch as these simple projects grow into a signature element of your home’s unique character.